Don’t hit the back button before you read some of this. I know most of you think that this program is complicated and you will probably never want to use it. Quite understandable as I felt much the same way at one time. Yet, now that I’ve learned a bit about all the great features it has, I couldn’t do without it.
When you open Photoshop for the first time, seeing all the tools and palettes can be a dizzying experience. Just remember that you only have to learn one thing at a time and leave the rest for other days. By learning just what you need in order to get better web pictures or prints from your home printer, it will be a fun and enjoyable experience.
I will take just a line or two and mention how we get pictures into the computer. If you have existing prints, then you will need a scanner to convert them into digital format. This is a relatively easy process and the only thing you need to know is what resolution to scan. If it’s for the world wide web, then a low resolution in the range of seventy-two to one hundred dots per inch is required and if it’s to make prints with, then anything over two hundred and sixty is fine, depending on the size of the picture you wish to print. With this in mind, lets open Adobe.
Ok, here we have a nice blank workspace and we need to get a picture on the page. If you go to your file options, you’ll see a command called new. This is where you bring your photo to Photoshop. Once we click on this, it will list all the logical places where our scanned photo will have been stored. Click on the photo you want and presto, away we go.

BEFORE
|
Now, the fun stuff begins. The first thing that most people want to do is sharpen up a scanned photo. This is because every scanned photo has lost some of its density and sharpness in the process. We look at the top bar and see an option called image. Clicking on this opens it up and gives us a sub menu. Here we see a command adjust and once again we click on this to get another menu. Now we are into the nitty-gritty, the guts of Photoshop. Looking at the options, we see one that is quite familiar, brightness and contrast. We tentatively open this and see what it is. Looks pretty simple, and we try it. Yeah, we exclaim as we see instant results and our picture seems a hundred times better. But is this the best way to get our pictures up to snuff? As you have probably expected, it is not the best way. It seems to work just fine, but if we examine the photo carefully, we can see where it falls short. If we go back to the image sub menu we will find a command called levels. This is a lot better than the previous command. Here is why.
|
|---|
Opening levels gives us a view much like a graph chart. Filled with peaks and valleys. Look at the left and you’ll see a slider just under the graph. Actually there are a total of five sliders, but let’s take them one at a time. The left slider, if moved just so that it lies under the first peak, sets the blacks. This means that the blacks are true and yet nothing else in the picture is changed. If we go to the right and move the slider to the left, we are adjusting the whites and only the whites. Remember just to go to the first peak and no farther as you will whiten shades of grey that are about ninety-five percent white and you start to lose detail. Now we will try the middle slider. This adjusts all the shades in between without affecting the true blacks and whites. Don’t worry if you are using colour photos as the principles are the same. Once you have completed this step, your pictures are at the optimum brightness and contrast. I would say that was pretty easy to do and after trying it on a couple of pictures, I am sure you will agree. But the picture is still sort of dull and not very sharp. On to the next step then.
Look across the header bar and you’ll find an option called filters. Clicking on this opens a menu of numerous filters that we can use and I would recommend that you play with them and see just what they all do. The one we want this morning is the one called sharpen. By clicking on this we once again get a sub menu and once there, click on unsharp mask. Look for the Preview Square and make sure that it is checked with a little arrow. These previews are found in all menus and are usually set in the default mode. This way, you can see what you are doing in real time. But in the event that you turned one off by accident, then just check it back on.
|
Ok, now we have three choices or options. If we look at the bottom one, we will see that is labeled threshold and this we set to zero. The next one up is radius and we don’t want much more then 1.0 for this. Now we play with the top one called amount and depending on the photo, this can be anywhere from sixty to a couple of hundred. You can easily see by looking at the photo what is the best. Once you have adjusted this, your picture is usually completed. If you have followed the steps described, your picture should have a remarkable improvement and is now ready to send somewhere on line or to be printed from your home set-up. But before we close this chapter, there is one thing you should know. Once again look at the headers and chose file, then, save as. If you are sending this picture as an attachment to an e-mail, then save as .jpeg which is a compressed format and takes less space. If it’s to be printed, then keep it in .tiff and that will do the trick.
|

AFTER
|
|---|
There are huge books out in the market that explain many different functions of Photoshop and I would highly recommend buying one. This is a huge program and there is nothing that can’t be done with your photos.
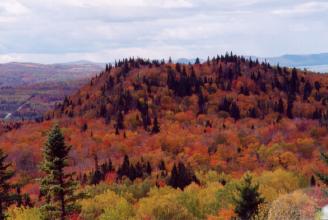
From this
|
You are only limited by your imagination. So have fun and until next month,
Happy Photoshopping.
|
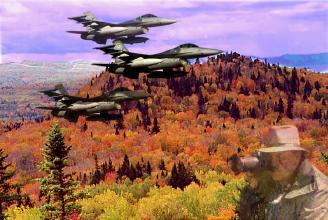
To this
|
|---|